Sand Away Wood Floor Woes |
|
|
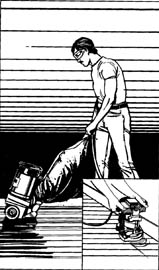
Refinishing a wood floor in your home is not a job to take too lightly. It does require pre-planning, preparation, a strong back and time. How much time depends on whether you are merely applying a new finish, completely sanding and refinishing, or preparing rough flooring for finishing. Be prepared to put the room out of service for a time and remove everything possible, including window coverings. The machine will collect and bag most of the dust but it doesn't take much dust in the air to coat everything. Cover doorways with plastic sheeting to contain the dust. If starting from square one, be sure you plan ahead so that you do not have the rental equipment sitting idle while you are preparing for the project. We can help you with your planning and with the selection of the right equipment and accessories to give your floor the "showcase" appearance. Once you've finished reading I hope you'll be better able to tell if this is a job you can tackle or if it's one best left to a level of confidence and skill. For do-it-yourselfers, primary costs of refinishing a wood floor will be for sand paper, finishing material, and renting a drum sander and an edge sander. A small orbital finishing sander may also be useful. Replace or counter-sink all nail heads. Sweep the floor thoroughly. To prepare the actual surface, remove any molding and then scrape the floor lightly with a broad knife to remove loose finish and debris. Use a flexible but hard-curing wood filler to fill small cracks, nail holes and gaps. Be sure to match the filler colour with the final floor finish. That done, nail down any loose raised or squeaking boards with finishing nails. For best results, pre-drill the holes. There are three phases of sanding: rough sanding, preparatory sanding, and finish sanding. For rough sanding use coarse sandpaper such as 20-grit. Be sure dust bag is securely attached to dust pipe on the sander. Lower drum gently at the start and raise smoothly at the end of each path overlapping a few inches each pass. Generally it is best to sand parallel to the boards to prevent cross-grained scratches. Empty the dust bag often for best vacuuming results. |
Use an edger to remove old coating from borders, closets and stairs. Use a circular motion to avoid deep cross-grain scratches. Any finish left in tight spots can be removed with a sharp paint scraper. In preparatory sanding, use a medium sandpaper such as 36-grit. Work away from electrical outlets rather than toward them. Carry the cord over your shoulder to keep path clear. Again, use the edger to get the borders, closets and stairs. All traces of old coatings should now be gone. To finish, apply bleach to any discoloured spots. Use 80-grit sandpaper and sand parallel with boards. Examine the floor for any marks left and smooth out. Vacuum the floor thoroughly to remove dust from cracks and wipe the entire surface down with a tack cloth and you have a wood floor that's ready for an application of new finish. Some people use one of our floor polishing machines with a very fine steel wool pad (00 grit) to "sand" off the raised grain, dried bubbles and trapped particles between coats. Remember to clean up the residue (vacuum and tack cloth) each time before applying finish.
|
 |
|