Concrete's Not So Hard |
|
| Working with
concrete intimidates many do-it-yourselfers. The sheer permanence of
concrete tends to give folks pause. But, with a few answers and the
right equipment, you just many find that it's not as hard as you'd
imagined. In this article, we'll offer some basic advice on pouring
concrete. But for more specific answers, stop by our store.
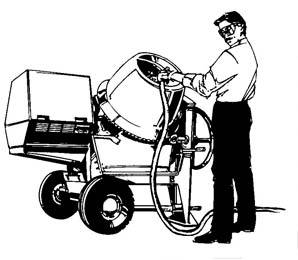
Don't start with a large project. Try replacing a section of cracked sidewalk or creating an air conditioner pad. If the project is too large, leave it to the professionals. But with a small to mid-size project, you can save yourself a lot of money by tackling it yourself. The best conditions for pouring concrete are 10 to 21 degrees Celsius (50 to 70 degrees Fahrenheit) with no precipitation. Start by "prepping" your area. Flatten, smooth and level the soil and compact it with a a rented plate tamper. Fill low spots with sand. Then build "forms" of 2x4s to contain the poured concrete. Some contractors wipe motor oil on the inside of the forms so they'll separate easily from the new concrete once it's cured. Concrete is very caustic and can damage skin, so wear protective clothing and equipment to protect skin and eyes. For a good-sized home project, a concrete mixer can save you lots of time and effort. Stop in and we'll rent you one and provide operation advice. Buy the concrete mix with gravel and sand already mixed in to save yourself some trouble. Then, with a mixer, you just add the right amount of water. For small concrete mixing jobs, you can toss the ingredients into a plastic garbage can, tilt it 45 degrees and roll the bottom around. Of course, larger jobs will call for a rented mixer. Dump the mixed concrete into your form, starting at one end. Use a screed board, or strikeoff board, to level it off by running the board along the top of the form, scraping away excess concrete. Shuffle the screed board from side to side. Fill low areas with small amounts of concrete and screed until level.
|
Dump the mixed concrete into
your form, starting at one end. Use a screed board, or strikeoff board,
to level it off by running the board along the top of the form, scraping
away excess concrete. Shuffle the screed board from side to side. Fill
low areas with small amounts of concrete and screed until level.
Smooth the surface with a bull float immediately. The float further levels small dips. Then, when the water sheen leaves the surface and the concrete stiffens slightly, finish by edging, jointing, floating, trowelling and brooming. Edging means rounding and compacting the edges, making them less likely to chip. Start by cutting the concrete away from the form about one inch deep with a trowel. Run the trowel along the board, pushing in a series of short, jabbing motions. Then make one long continuous pass. Jointing helps control cracking problems. Use a groove tool and do it while the concrete is still pliable. Then, float to bring fine aggregate to the surface for further finishing. Immediately follow with a finish trowel to further smooth the surface. Go over it with a stiff-bristle push broom so the surface is slip resistant. Then cover the area with plastic for 2 or 3 days to allow it to harden. After that, remove the forms and you're all set.
|
 |
|